About Me

Lindsay M Starr is a beadwork and mixed media artist currently based in Nashville, TN. She spent her early childhood in Alaska, and her school age and college years in Oregon. Lindsay has a great appreciation for history, science, and nature and is consistently inspired by insects, sea life, color, and the significance of beads and beadwork throughout human history. She spends her days beading, walking at the zoo, and practicing yoga. Lindsay loves to share her knowledge and passion for beads and beadwork to hobbyists of all skill levels.

Sunday, June 30, 2019

June 2019 Art Elements Challenge - Selkies

This month has flown by in a storm of sewing.  Check out this post over at the Art Elements blog to see all the other projects I've been up to!  Since I had Sewfia all set up, I knew that sewing for the Selkie challenge this month would be the best way for me to finish a project...or maybe a few...
I started out with this pattern from CraftyKooka on Etsy.  This burgundy seal was my test of the pattern to make sure I could do with it what was in my brain... 
Once I was sure it would work, I made a second...


...and a third very special seal...

I love how they look all together!

But this is what I had to test out...Each seal is really a Selkie, so I had to make a way for the seal coat to be removed from...
The pattern for my little dolls is from MilosikiDolls.  The faces are from DollProject - I bought them when she sold them on Etsy, however they are still available in her Spoonflower shop.  They are very simple to sew up, and I hand stitched on the faces and hair.  Their wigs are made of mohair from FantasyDolls

Because one of the seals is super special, I made another doll to go along with it...

They look like they belong together!  This pairing is a gift for a very special friend that is going through a really hard time.  I thought she needed the most special, most magical Selkie ever to exist.  I still need to make a few clothes for all of the dolls and finish the hair for the other three, but can take my time with them. 

Here is how the belly pouch works!  

The seals are all under stuffed through the body intentionally, so that when the doll is zipped in they make a perfectly plump stuffed animal.  You would never guess until you unzip the pouch that a secret is hidden inside.
Please hop along to the other participants of the challenge this month!  I can't wait to see what everyone else is up to!
Guests: 

AE team: 

Sunday, March 31, 2019

March 2019 Art Elements Challenge - Luna Moth

Lately I've started every post with "where did all the time go?!?!"...but not this time.  I know exactly where all my time went this month.  Every spare minute was spent on parts and pieces and assembly for this challenge.  This is due to the fact that I had been planning what I was going to make for nearly 2 months beforehand, as soon as Jen had put her theme on our group schedule.  Normally I procrastinate and leave everything for the last week of the month, but one of the projects I was planning is something that has been in my mind for years...
I vividly remember my first encounter with a luna moth.  It was the summer before I started highschool on our drive from Oregon to South Carolina to visit my grandparents.  At some point in the midwest my mom found a luna moth in a rest area bathroom.  I (of course) kept the moth until it died.  This started a summer trip of insect and entomology obsession.  I was convinced I was going to become an entomologist and spent the time in SC collecting insects.  My grandfather took me to the nearby university to buy me a used entomology textbook, pins, and vials.  The bag in the picture above came about a few years later when I was in highschool, and remains the largest piece of charted beadwork I've ever stitched.
For the following projects, I used a lot of photo references, but also relied heavily on this actual specimen from my friend Ash.  She's one of my local bug friends that has had some luck with raising luna moths from eggs - both wild caught and captive raised.  She gave me this gal a few years ago and this came in really handy when I needed a quick 3D reference.
Moving on to the projects...please forgive my lack of captions on most photos...there are so many!  I had a really fun photo shoot with both of the soft sculpture projects and couldn't choose!

PROCESS -
I decided straight away that I wanted to make both a stylized doll and a giant realistic soft sculpture moth - roughly large kitten sized...  It's easier to pattern if I have my own sketches of the item I want to make - it helps my brain turn the idea into flat pattern pieces that will eventually turn into a three dimensional item.  You can also see here my lists of materials needed and ideas that might not make it into the final pieces...
Collecting fabrics and other materials from my stash...I had originally intended to use this green silk charmeuse for the wings on both the doll and soft sculpture, however I ended up needing to get 2 other fabrics for the large moth.
Progress...
Giant realistic antennas...
Bodies - the two photos on the left are for the realistic moth, the one on the left is for the doll.  

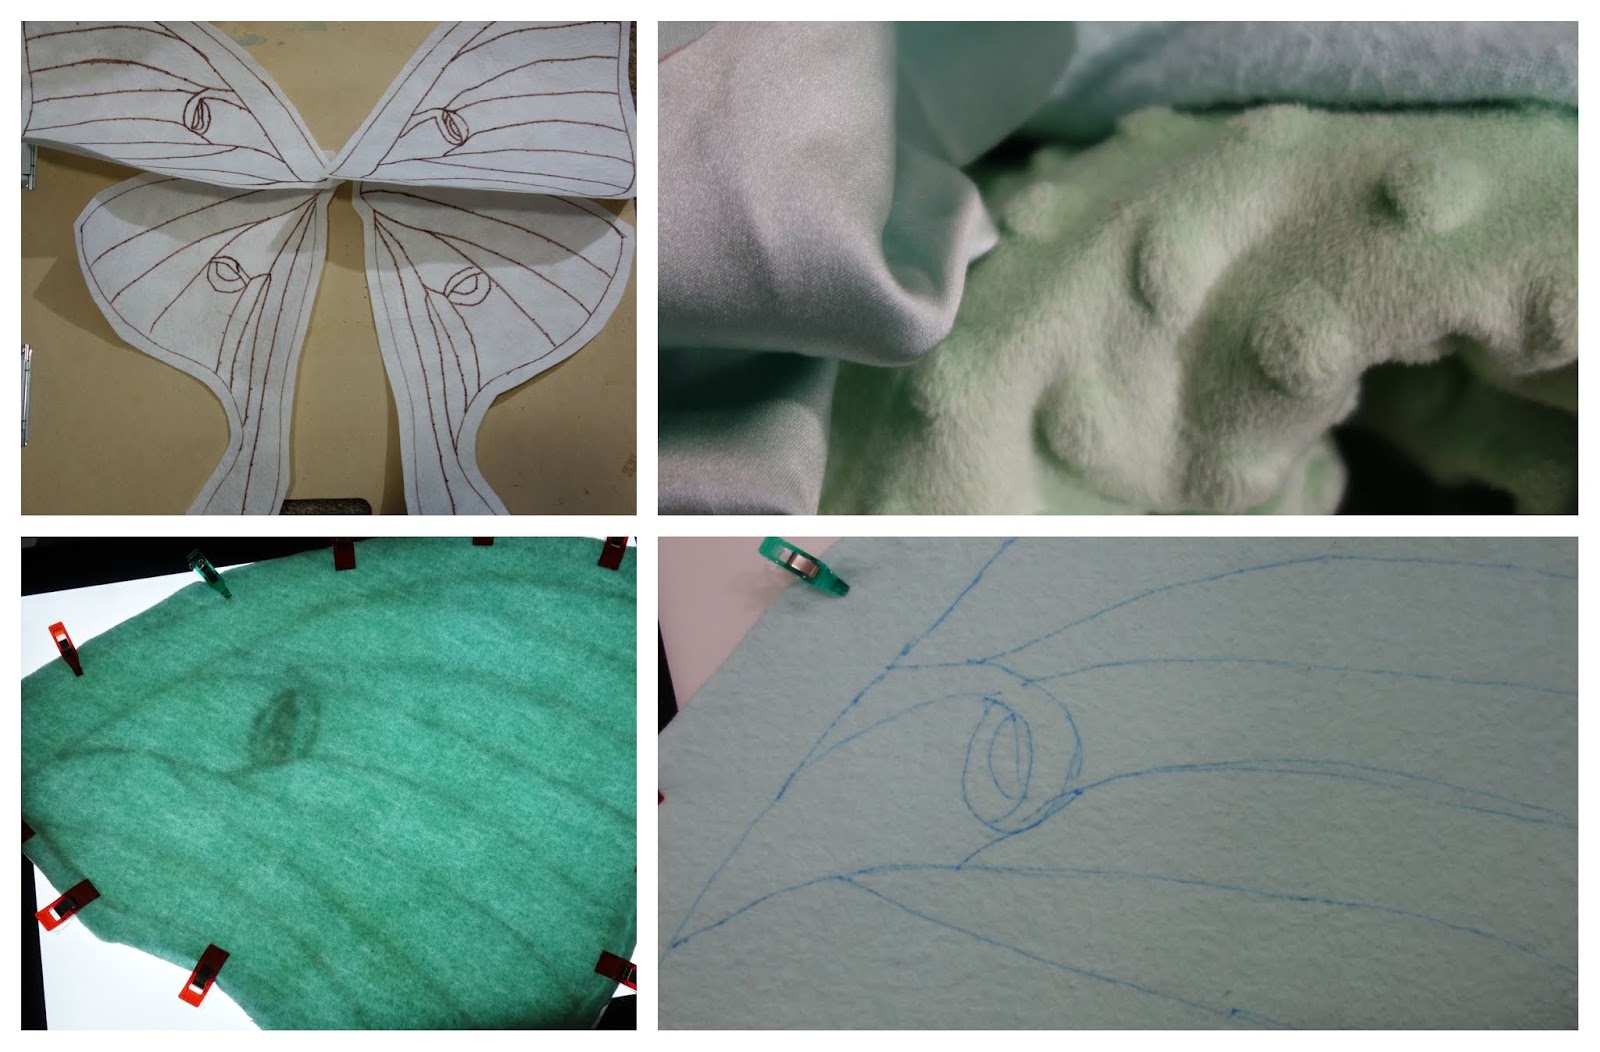
Wing steps for the realistic moth - The process for this was similar to a quilt, using a thick interfacing instead of batting.
DOLL -


I'm pretty pleased with these itty bitty boots...


Is this an artistic nude?

GIANT REALISTIC MOTH -
I had to go borrow a friend's yard and front door for this photoshoot...

...mostly because I could see this photo in my mind.  

Let me in!

The wingspan is just under 36 inches.


ONE MORE MOTH-Y PROJECT
I also squeezed in just enough sewing time at the last second to make two doll "sleeping" bags for my Momoko's.  I've been wanting to make storage/transportation bags for all of my dolls.  This protects their faces from rubs and scratches to the surface or paint during travel especially.  The flannel left from the moth wings makes the perfect lining fabric, and the theme gave me the perfect reason to break out my small stash of luna moth fabric...  The girls approve! 
I hope you have fun browsing these photos, and will forgive my lack of words this month!  If you have any questions on the process or materials used, please leave a comment and I will reply as soon as I can!
I hope you will hop along and check out what everyone else has been up to this month.  I can't wait to see how everyone else has been inspired by this mysterious and ethereal creature!
Guests:

Art Elements Team:


Lindsay (you are here!)

Thursday, February 28, 2019

Art Elements February 2019 Challenge Reveal - Birds of Prey

Where, oh where has this month gone!?  February seemed extra short to me this year.  Somehow I still carved out some time to create, so can't wait to show you how my birds of prey challenge went this month.  

For years I volunteered at Chintimini Wildlife Rehabilitation Center outside of Corvallis, Oregon. The organization  rescues, cares for, rehabilitates, and releases as many wild animals and birds as possible each year.  I specialized in training new volunteers, and rearing older orphaned (fledging) songbirds and raccoons.  Raptor care was handled strictly at the volunteer center, due to the specialized handling and housing needed.  Over the years that I volunteered, I was able to care for and observe most of the different raptor species that reside in the Pacific Northwest.  The main goal was always wild release of a healthy animal, but every year there were some birds of prey that could never be fully rehabilitated.  While some could be rehomed to other facilities, such as zoos and regional wildlife centers, some were kept at the center to be part of the education program.  Only birds of prey were kept on as education animals for Chintimini's outreach programs, as they never become fully tame and appear unappealing as a potential pet.  They are always a good example of why it's important to rehabilitate and release wild animals as quickly as possible.  Even after working closely with many types of wild animals and birds of prey, one species in particular is close to my heart.  

I have long known that barn owls are one of my spirit animals.   I had some outstanding encounters with them at Chintimini's, and also in the wild.  There is nothing quite as eerie as the scream of healthy barn owl...unless it's a night encounter as a ghostly pale shape soars silently past your head.  One time we had both an abnormally pale morph barn owl, and a melanistic barn owl in the clinic at the same time.  It was super interesting seeing such dichotomy in the same species!

I had glued down and partially bezeled a barn owl face cab by Jenny a couple of years ago, intending for it to be part of a completely different project.  When that idea went a different direction, I stashed this away in one of my boxes.  When this month's challenge theme was announced, I finally knew that it was time to finish my barn owl cab into something I could wear to share my love of this fine raptor.  

Barn owl face cab by Jenny Davies-Reazor, lampwork heart by Beth Mellor of BeeBoo Beads.  Peyote bezel, bead embroidery, brick and picot edging, and framed fringe.  Strung strap and sterling toggle
While I was pinning ideas for the barn owl necklace at the beginning of the month, I stumbled across pictures of what I at first thought was a kind of "goth" artist's interpretation of a barn owl.  I came to discover these beautiful owls are actually Greater and Lesser Sooty Owls from Australia.  They are of the same genus as barn owls - Tyto - which consists of 15 species world wide.  Just look at these gorgeous creatures!  They look so similar to a barn owl, but for some reason I was completely smitten with the coloration and had to try my hand at a sooty owl as well.  

First came the sketch.  You can see the list of pattern pieces I knew I would need to the left, and multiple ideas in between the two sketches.

I then drew, cut and tested a pattern for the owl.  I just realized, I'm missing the "bib" piece that goes under the face in this picture...pretend it's there!

Then I ordered some gorgeous fabric from this Etsy shop.  Beautiful long pile minky!  From left to right - Black/silver became the wings, gray lizard print became the body and underwings, mid gray is the bib, light gray tie dye is the belly and bottom, and the ivory is the face.  The short pile medium gray is the feet. 
And it all became this beautiful creature!


The body, wings and feet are all sewn from the fabrics pictured above.  The eyes and beak are ultrasuede, and the eye shines are vintage sequins. 
Meet Tenebrous - my plush sooty owl.  Not sure if he's a greater or lesser sooty...he's still shy.  I'm pretty pleased with myself that he turned out so close to my original sketches.  And the name fits too - tenebrous means "obscure" or "murky", and the latin root tenebrae means "darkness".  Fitting, isn't it?  I'm not sure if he will end up as a bed pillow or throw pillow on the couch, but either way, he's very good at cuddling.  Maybe I'll try my hand at patterning some more plushies in the future!  I've had enough practice sewing other people's pattern's at this point, it's a fun challenge to take the ideas in my head and turn them in to reality.  

I do hope you'll hop along and see how everyone else was inspired by birds of prey this month!  I can't wait to see what everyone else has been up to!

Guests:
Sarah 

Team Members: 

Lindsay  You are here!

Thursday, January 31, 2019

Art Elements January 2019 Challenge Reveal - Mooning Moon Moons...

Hello Everyone!  I promise, I'm still here!  2018 was just not a good year for us in so many ways, it sapped my energy, both creative and physical.  Perhaps my new years resolution last year was a bit grandiose, so I'm starting out a bit smaller this year with simply resolving to participate in the Art Elements blog challenge every month.

So to kick off the new year, I hosted the Moon theme challenge this month!  I knew I had plenty of kinds of moon themed beads and components stashed away, but nothing quite like what I had in mind, so I reached out to one of my leather worker friends.

Mel is a ceramic artist, and has branched out into leatherwork in the last few years.  She had already planned to come spend a weekend with us earlier in the month, so I was super excited when she agreed to try to make a few moon themed tooled leather cabs for me.  She held off on the dying, and we had a fun creative evening dying and painting.  Dying leather is something that plagues many a leather worker with anxiety and doubt, however it is the only part of working with leather that I enjoy!  We set up on my coffee table and went to town.

After she left, a few days later I completed a couple coats of finish so they are now colorfast.  The gloss also brightens up the color and detail considerably, as it removes the dullness that the surface of leather normally has.

As I dyed the small moon, I had my little moth bead by Diane Hawkey on the table.  From the first second I saw it, I thought this little moth looked like a rocket ship.

And so...we now have a necklace titled "Rocket Moth".

The necklace consists of four sections - the moth and beadwork flames, almost like the sections of rocket that part from the main space ship...
The journey to the moon - Black and purple velvet 11/0 seed beads are mixed with a few silver duracoat 15/0's, vintage lucite moonglow ovals, and the last of my itty bitty lampwork spacers that a friend made years ago.  He was a stained glass artists as well, and experimented with melting down some of his excess glass sheets for lampwork beads.  These little spacers look black at first glance, but if you hold them up to the light they are the most lucious shade of dark grape purple...I know the picture is a bit blurry, but it's the best representation of the color - between the angle of the light and the proximity to black, you can actually see a hit of the color.  To me, this is the color of space.
The moon - Mel's tooled leather cab has a peyote bezel, a few rows of embroidery, and then a few rows of brick stitch finished off with a picot edge.  I would have done the whole piece embroidered, but I was using scraps of ultrasuede and hit the edge of the scrap after 3 rows.  Because it wasn't quite large enough at that point, brick stitch added some more bulk until it reached the size I wanted.
And the galaxy!  Or really, the necklace strap, but why be all boring and call it that?  I raided my stash of large Czech pressed glass and came up with these two jumbo flat ovals - one in montana blue, and one in transparent dark gray.  A smaller size of black flat oval is mixed with textured dimes in a sunny orange with full AB coating.

I am really happy with the results of this piece, and it went together way faster than I was anticipating.  So much faster, that I had time to start and finish a second piece with another one of the cabs...  I am happy to introduce to you...(insert cheesy overly long drum roll here)....

Moonbob Squarepants.  I half-jokingly asked Mel for a mooning moon cab...I mean really, how could that even be done?!  But she did it, and I dyed it...and he ended up reading so much better than I could ever have anticipated!  I've worn the necklace a couple of times already, and the reactions of my coworkers are priceless.  It makes me giggle all day long!
The fringe looks ornate, but is actually simple...there are 3 layers in different lengths.  I started with a base layer of looped fringe that arks from one side of the embroidery to the other.  The next layer alternates glittery blue daggers and thorns as the terminal bead, and the shortest is another looped layer with teeny pink seed beads and purple velvet mini-daggers.
I love how quickly a large cab turns into something substantial enough for a necklace.  Just a few rows of peyote bezel, and a few rows of embroidery and picot edging and DONE!  Isn't he cheeky?  I can hear your eyes rolling from here...but wait, I'm not done!
(To the tune of the Spongebob Squarepants theme)
Who lives in a rocket ship, shiny with glare?
Moonbob Squarepants
Sporting his luminous rump in the air?
Moonbob Squarepants
If celestial nonsense is something you wish....
Moonbob Squarepants
Then pick out a star and make a quick wish!
Moonbob Squarepants
Moonbob Squarepants
Moonbob Squarepants
Moonbbooobbbbbbb Squarepaaaannnnntttsssss
Yeah...I went there...(I really hope you don't have the song stuck in your head now...)

I do hope you will hop along and see what all of our lovely participants and crew were inspired to make this month!  I'm off to do that right now!