About Me

Lindsay M Starr is a beadwork and mixed media artist currently based in Nashville, TN. She spent her early childhood in Alaska, and her school age and college years in Oregon. Lindsay has a great appreciation for history, science, and nature and is consistently inspired by insects, sea life, color, and the significance of beads and beadwork throughout human history. She spends her days beading, walking at the zoo, and practicing yoga. Lindsay loves to share her knowledge and passion for beads and beadwork to hobbyists of all skill levels.

Saturday, December 28, 2019

Art Elements December 2019 Challenge - Handmade Christmas

'Tis the season!  Not only the season for another Art Elements theme challenge, but also the season to drive yourself nuts trying to get all the gifts and decorations and cleaning and food done before the festivities.  I am so tired but proud of what I've accomplished this year!  Here's a sampling of what I finished for the holidays:
Catnip pickles.  I wanted to do a project with my friend's daughter while we were in Knoxville for Christmas, and these ridiculous things were it.  I had them all pre-sewn, cut and turned right sides out.  Katie helped me choose and set eyes in each one, stuff them with fluff and catnip, and cut the yarn "stems".  I finished them up on the machine and then we sorted them out for all the kitties in our lives.  We made about 25 pickles in total and after we chose the ones to gift to specific cats, the rest will be going to the humane society when she goes to practice reading to the kitties next.  So far I am receiving reports that the pickles are irresistible to all cats, young or old, big or small...as my friend's cat Lucky demonstrates here. 
As mentioned above, there is a new member to my friend's household - this is Cheetah.  He has added so much joy to their home, I thought he might appreciate more than a pickle.  I found this awesome free pattern and tutorial online and made the majority before I headed over to Knoxville.  I still had to hand sew the binding around the hole.  He supervised every stitch and immediately inspected once I turned it right side out and put the cushion back in.  I think I passed inspection!
For my friend and her husband, I made these two sloths that went with their bedroom colors.  These are from a free pattern by my favorite plushy pattern maker., Choly Knight  As a last second request I also made 2 more "snuggle" pillows, the red and gray with silver ones.  The other gray one I made last year so now no one needs to fight over it!  The pillows have no pattern - I simply trace 2 circles from my friend's smaller plates (yes, the dishes in the kitchen cupboard), and cut a rectangle to fit the circle circumference.  I believe I also sewed the duvet cover a couple of years ago.  Normally, I do small household sewing or the family mending for Christmas, but branched out a bit this time.  
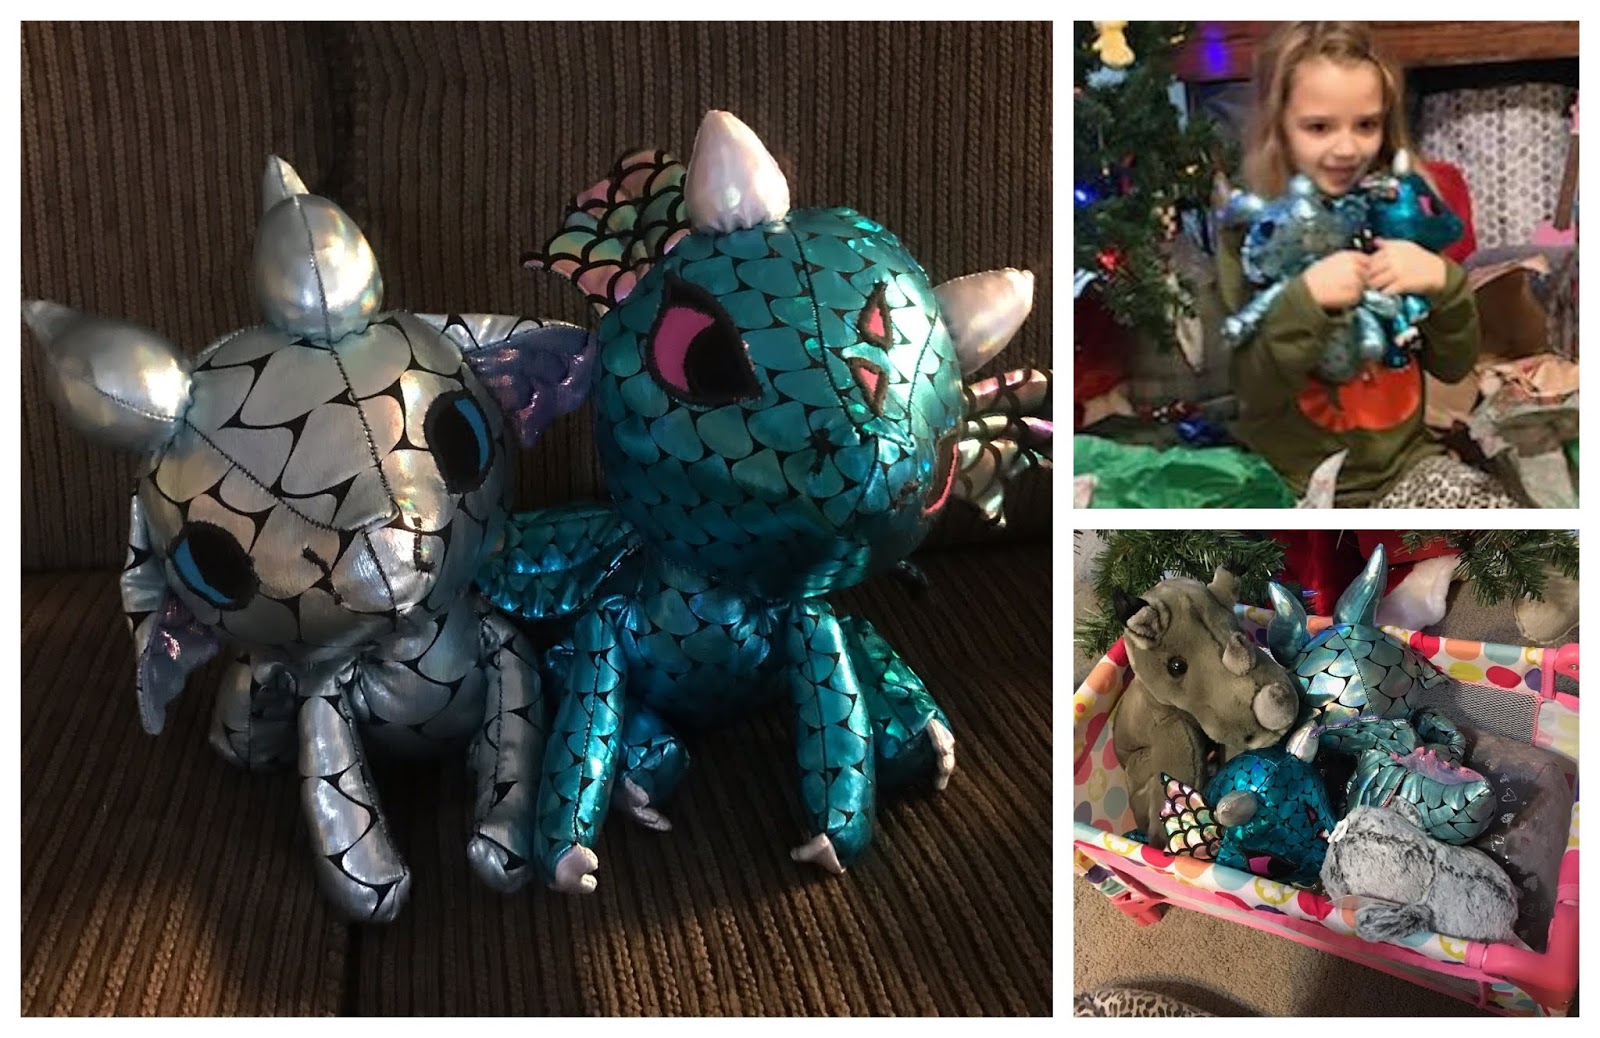
For the kiddo herself, I made baby dragons to go with her Halloween costume.  These are also a Choly Knight pattern.  Because they are babies and they need very delicate care, they went straight in the doll pack-n-play as soon as they were snuggled, along with the Christmas rhino and penguin.  Normally I would make these out of a sturdier fabric.  Normally I would choose something less difficult to sew than foil covered spandex.  But the results were worth it!
Finally, I've been making articulated foxes.  For decades I've wanted to make stuffed animals with classic teddy bear articulation.  For some reason it had built up into my mind as a huge challenge, somehow different than all of the other plushy and doll making that I've ever done.  I found a nice pattern on Etsy and low and behold...it's much easier and more fun than I thought.  So fun that I've already gifted these four, have one more mostly assembled, and 2 more cut and ready to go!  After I get through those and get them to their intended homes, I'm going to work on patterning my own woodland gallery of articulated critters!  
I still have multiple projects in the wings for family back home.  With everything I needed to get done for people we were seeing over the holidays, I just had to prioritize the projects.  Most likely January and February will still heavily feature the rest of my Christmas projects. Oh well, maybe some random happy mail in a month or two will be a fun break for the recipients. 

I hope you will hop along and see what everyone else has been up to!
Thanks for looking!
AE team: 
 

Guests: 


Saturday, August 31, 2019

August 2019 Art Elements Challenge - Octopus

Well, here we are again!  Another month, another challenge.  This month I was able to participate in one of my favorite theme challenges ever...Octopus.  Thanks to Claire for the great choice!  You'll have to forgive me for the picture heavy/narration light post.  I had fully intended to walk you through more of the creative process, but was so excited to be working on this project that I completely forgot to stop and take any pictures!

I've always loved cephalopods of any type, but especially octopuses.  This is my small collection of commercial stuffed octopus.  I used the gray one to make a pattern from...
I drew directly on the seams of the stuffed animal, so I could see the seams easier.  This allowed me to pin some tracing paper on to the animal and trace off the pattern pieces.  Once I could see the flat shapes, I decided how big my finished critter should be and started enlarging everything.

Stuffing the tentacles was a challenge and took most of one day.  They ate up an entire California king sized high loft quilt batting!!!
And then, stuffing the body used up all the rest of the stuffing that I had on hand and sent me out to the fabric store for more!  

Here we are, fully stuffed, though there is still quite a bit of work to go. 
I knew there was no way I could apply 3 dimensional suckers in the time I had left, so I went more of an interpretive direction.
I bought Liquitex fabric medium so that I could make "fabric" paint from normal acrylic paints.  This medium allows the acrylic paint to stay flexible when dry, and changes the viscosity so that it is less likely to soak into the fabric. 
Once all the paint dried, I had to take Ottoman the Octopus out on the town...or really just out of doors for some good light!


The suckers dried to the perfect subtle hint of texture. 


I bet you didn't know that babies and octupuses get along swimmingly...I didn't either!
I hope you had fun checking out my creation!  Ottoman wishes you well.  Please hop along and check out how everyone was inspired by these fascinating cephalopods this month!  I'm off to do just that. 

Sunday, June 30, 2019

June 2019 Art Elements Challenge - Selkies

This month has flown by in a storm of sewing.  Check out this post over at the Art Elements blog to see all the other projects I've been up to!  Since I had Sewfia all set up, I knew that sewing for the Selkie challenge this month would be the best way for me to finish a project...or maybe a few...
I started out with this pattern from CraftyKooka on Etsy.  This burgundy seal was my test of the pattern to make sure I could do with it what was in my brain... 
Once I was sure it would work, I made a second...


...and a third very special seal...

I love how they look all together!

But this is what I had to test out...Each seal is really a Selkie, so I had to make a way for the seal coat to be removed from...
The pattern for my little dolls is from MilosikiDolls.  The faces are from DollProject - I bought them when she sold them on Etsy, however they are still available in her Spoonflower shop.  They are very simple to sew up, and I hand stitched on the faces and hair.  Their wigs are made of mohair from FantasyDolls

Because one of the seals is super special, I made another doll to go along with it...

They look like they belong together!  This pairing is a gift for a very special friend that is going through a really hard time.  I thought she needed the most special, most magical Selkie ever to exist.  I still need to make a few clothes for all of the dolls and finish the hair for the other three, but can take my time with them. 

Here is how the belly pouch works!  

The seals are all under stuffed through the body intentionally, so that when the doll is zipped in they make a perfectly plump stuffed animal.  You would never guess until you unzip the pouch that a secret is hidden inside.
Please hop along to the other participants of the challenge this month!  I can't wait to see what everyone else is up to!
Guests: 

AE team: 

Sunday, March 31, 2019

March 2019 Art Elements Challenge - Luna Moth

Lately I've started every post with "where did all the time go?!?!"...but not this time.  I know exactly where all my time went this month.  Every spare minute was spent on parts and pieces and assembly for this challenge.  This is due to the fact that I had been planning what I was going to make for nearly 2 months beforehand, as soon as Jen had put her theme on our group schedule.  Normally I procrastinate and leave everything for the last week of the month, but one of the projects I was planning is something that has been in my mind for years...
I vividly remember my first encounter with a luna moth.  It was the summer before I started highschool on our drive from Oregon to South Carolina to visit my grandparents.  At some point in the midwest my mom found a luna moth in a rest area bathroom.  I (of course) kept the moth until it died.  This started a summer trip of insect and entomology obsession.  I was convinced I was going to become an entomologist and spent the time in SC collecting insects.  My grandfather took me to the nearby university to buy me a used entomology textbook, pins, and vials.  The bag in the picture above came about a few years later when I was in highschool, and remains the largest piece of charted beadwork I've ever stitched.
For the following projects, I used a lot of photo references, but also relied heavily on this actual specimen from my friend Ash.  She's one of my local bug friends that has had some luck with raising luna moths from eggs - both wild caught and captive raised.  She gave me this gal a few years ago and this came in really handy when I needed a quick 3D reference.
Moving on to the projects...please forgive my lack of captions on most photos...there are so many!  I had a really fun photo shoot with both of the soft sculpture projects and couldn't choose!

PROCESS -
I decided straight away that I wanted to make both a stylized doll and a giant realistic soft sculpture moth - roughly large kitten sized...  It's easier to pattern if I have my own sketches of the item I want to make - it helps my brain turn the idea into flat pattern pieces that will eventually turn into a three dimensional item.  You can also see here my lists of materials needed and ideas that might not make it into the final pieces...
Collecting fabrics and other materials from my stash...I had originally intended to use this green silk charmeuse for the wings on both the doll and soft sculpture, however I ended up needing to get 2 other fabrics for the large moth.
Progress...
Giant realistic antennas...
Bodies - the two photos on the left are for the realistic moth, the one on the left is for the doll.  

Wing steps for the realistic moth - The process for this was similar to a quilt, using a thick interfacing instead of batting.
DOLL -


I'm pretty pleased with these itty bitty boots...


Is this an artistic nude?

GIANT REALISTIC MOTH -
I had to go borrow a friend's yard and front door for this photoshoot...

...mostly because I could see this photo in my mind.  

Let me in!

The wingspan is just under 36 inches.


ONE MORE MOTH-Y PROJECT
I also squeezed in just enough sewing time at the last second to make two doll "sleeping" bags for my Momoko's.  I've been wanting to make storage/transportation bags for all of my dolls.  This protects their faces from rubs and scratches to the surface or paint during travel especially.  The flannel left from the moth wings makes the perfect lining fabric, and the theme gave me the perfect reason to break out my small stash of luna moth fabric...  The girls approve! 
I hope you have fun browsing these photos, and will forgive my lack of words this month!  If you have any questions on the process or materials used, please leave a comment and I will reply as soon as I can!
I hope you will hop along and check out what everyone else has been up to this month.  I can't wait to see how everyone else has been inspired by this mysterious and ethereal creature!
Guests:

Art Elements Team:


Lindsay (you are here!)