Sunday, November 29, 2015

Art Jewelry Elements Component of the Month - November 2015

When I realized who was hosting the Art Jewelry Elements Component of the Month for November, I was instantly excited.  Caroline's work always inspires me - for some reason I feel like our design and color aesthetic meshes really well.  Just look at these awesome lichen pendants and cabs that we got to play with this month!
I couldn't choose between the turquoise or purple, so I asked if Caroline would just choose one for me.  I already had an idea in my head...
This is not quite what was in my head.  I envisioned a fringe loaded with little beaded cups, just like the face of the pendant.  When I had them made and strung onto the fringe, I realized that I just didn't like it.  The movement was wrong, they didn't hang properly, the plain part of the fringe didn't fit with the rest of the piece.  
So I wadded it all up in frustration...and realized that the problem had solved itself!  I went back in with a new thread, tangled and sewed the fringe into a jumble - this allowed the little cups I had beaded to lay in a cluster facing outwards, like the cups on the pendant.  I added a few more short fringes with bright blue vintage seed beads, to add back in a bit of the wiggle I had taken away. 
More of the bright vintage seed beads and pretty labradorite ovals make up the strap.  I love that these stones perfectly match the grey on the pendant. 
These stones are really light, compared to some labradorite.  Because of this, the flash is a little subtle, but every single one twinkles in its own way. 
Here is a clearer view of some of the beaded cups and tangled fringe.  
I used a rhodium plated TierraCast toggle, as I wanted something substantial, and I love how the dimpled texture ties in with the rest of the necklace.  You can see the flash in some of the labradorite beads here...
Finally back to the beauty shot!  I'm really excited to wear this piece tonight!  And to explore this color combination again.  I'm finding that I really like a light neutral-tone grey with saturated colors.  

Please hop along and see what everyone else has done with Caroline's lichen pendants!  I can't wait to see how the other color combinations look!

Guests

Sunday, November 15, 2015

Beading Back in Time - the Final Chapter - History!

Where has the year gone?  I can't believe it's time for the final chapter of our Beading Back in Time blog hop challenge.  It was this time last year when Sherri and I started talking about hosting a blog hop - a first for both of us.  It's been excellent having a partner to fall back on when life happens!  If you didn't notice, we agreed to delay the reveal date by 2 weeks this time - you know how busy this time of year is for folks.  I didn't get a chance to start my project until yesterday morning...even though I've had it planned in my head since January!

I've been looking forward to this theme since then - Choose your favorite historical time period.  The time period I chose has resonated with me on many levels, for quite a long time.  Between being a theater student, studying Shakespeare out of necessity, costume history, and loving jewelry/textiles/embellishment, this time period is a natural fit for me.  So when did I choose?
Inspiration from Pinterest
Elizabethan - the reign of Queen Elizabeth I, 1558-1605.  Ok, so who isn't fascinated by the clothing of this period, right?  The gowns, silks and satins, embroidery and beading, layers of opulence, pearls and gold, a time of technological and scientific innovation and revelation - what's not to love?  Since college, part of the fascination for me has also been the fact that the person that wrote the textbook we used in class had such obvious contempt for the dress of the whole period.  He used words like carapace, grotesque, contorted and distorted to describe the court clothing of the period.  I felt like making these statements as fact in his textbook had the potential to perpetuate his opinion that Elizabethan fashion should somehow be looked down upon because the silhouette was such an exaggeration of the human body.  In reality, the fashion of a period is always reflective of the geopolitical, cultural, social, architectural, technological, and scientific ideals and creations of the time.  You cannot discount the importance of the fashion of an era without ignoring everything that contributed to it!  I will not get into the history at all here - if you want to learn more, the two links above can get you started, and there are many excellent (unbiased) texts out there with fabulous pictures too.  
Ruff evolution - image found on Pinterest
Ruffs - perhaps one of the most identifiable clothing articles of Elizabethan clothing (the other being the farthigale) is the ruff.  This accessory evolved from the drawstring neckline and cuffs of an under-shirt or chemise.  During this period, the collar and cuffs became detached from the actual undergarment and became an article of clothing in their own right.  This allowed for the collar and cuffs to be laundered, re-starched, and even re-styled without needing to launder the entire garment.  As you can see, they started out fairly conservative...then as the years progressed, the aesthetic evolves until the extreme exaggeration that we all associate with Shakespeare plays and movies.
So, yes, I made a beaded ruff.  I've wanted to do this for YEARS!!!  But besides wanting to interpret one of the iconic clothing pieces of the period, I also tried to include several other fashion trends that I feel are representative of the period.  Layers of work, pearls and gold, leather, embroidery and beads in general, portraits/cameo/miniatures, and the richness/luster of the colors I associate with all of these things.  

When I stitched the base, I ran out of the coppery gold twin I was using, so it ended up a bit shorter than I was intending.  This actually worked out great though - it gave me a chance to include leather as the underside of the cuff, and makes a nice flat section for when you're working at a desk all day!  There are 3 colors of twins over all:  the coppery gold of the base, the lemony gold of the first netting row, and a slightly greenish gold of the second netting row.  I used twins mostly because I needed the boost in time they make - because twins add more height to each row, you end up progressing in height quicker.  Remember how I started the project yesterday morning?  Yeah...any time saving option was important...
Along with all of the twins, I used pearly lustered 11/0's, and then in the final peyote row a gilt-lined opal 15/0.  The last 3 rows of peyote stitch added some stability and refinement of the overall piece.  Once the beadwork section was done, I stitched it to two short pieces of leather, stitched two vintage glass pearl cameo buttons to one side, and cut buttonholes in the other side.  Done!  What do you think?  
Please check out what everyone else has been up to - I'm excited to see which historical period inspired all my creative friends!  Thanks for joining us on this blog hop challenge journey this year!  Stay tuned in January...we might have something new in the works...
Sherri Stokey <-----Co-Host
Lindsay Starr <-----You are here!
Anastasia Kristala Urbanski
Jenny Davies-Reazor
Stephanie Haussler
Niky Sayers
Melissa Trudinger
Kelly Rodgers
Michelle McCarthy

If you've enjoyed this Beading Back in Time hop, you can find previous ones here:  Pre-Human Edition,  Early Human Editionand Early Civilization Edition. 

Saturday, October 31, 2015

Art Jewelry Elements Component of the Month, October 2015

How does this sneak up on me every month?!?  Yes, it's time again for another reveal of the Art Jewelry Elements Component of the Month challenge.  Although...this time there was no component of the month, but rather a theme.  When Karen announced that we were all to challenge ourselves to be inspired by a Raven or Crow theme, I knew it would be fun!
Raven inspiration from Pinterest.
Growing up in Alaska, I have always identified more strongly with Ravens.  I love all the variations of black in their plumage, their antics, and all the lore surrounding them.  If you've never been up close to a raven, you should know that they are nearly twice the size of a crow, standing an average of  24" long, with a wingspan up to 50"...they truly are a majestic bird.  The images above give you an idea of the color palette I think of when I hear "Raven".  Unfortunately, none of the crow/raven components that I had in my stash already really fit into my preconceived color palette.  Then my buddy Katie Dirnbauer of Knoxville TN posted this piece on Facebook, and I had to have it...
Check out Katie's work on her Etsy page - KDD Jewelry
It's been really neat over the last few years to watch Katie's style develop and see her skill set grow.  In the last year or so I feel like she's really come into her own creatively, so when I saw this raven, I was happy to support a friend and fellow artist.  And now you ask...but Lindsay, this piece is finished!  How are you going to challenge yourself and create with it?  I admit, I was a little bit intimidated at first.  Then I remembered this piece I made for another artist friend a couple of years ago...
This friend wanted her fossil ivory feather to have some sort of arrangement where she could take off the beaded strap and exchange it for a strung or chain strap.  I got fancy after figuring that out, and made a few beaded charms that she could add or subtract as well.  So, how do I turn Katie's raven pendant into something like this?
First I made the beaded strap with loops on each end.  Then I scrounged around until I found a scrap of thick sterling wire.  It was already curved into some fancy shape that I never ended up using, so I hammered it out flat, cut it in half, filed all the ends smooth, and curled them into spiral shapes that I could slide the chain/beaded rope/and charms on and off of.  Oh yeah, the charms...
Each charm has a different look, different beads, different shapes.  I wanted each charm to speak "raven" in a different way.  There's a dimensional drop using some of my new quadratiles and the long Miyuki drops, a feather in dark oil slick colors, a captured rivoli with lampwork beads by SueBeads, Marie Sawyer, and my buddy Wilbur, and a captured vintage glass stone with a 2-holed Czech drum bead.  Because these charms dangle and twist around on their own, even the back of the captured stone and rivoli are fun to look at.  I didn't want to be constantly looking down adjusting the charms.
You'll have to forgive me this month, I was rushing to get pictures taken (taking them on the floor of my cubicle in the office), and missed out on the beauty shot (didn't miss out on the blur though...).  I guess there's always next time, right?  I hope you'll hop along and see what everyone else has created!  As always, thanks for looking!
Art Jewelry Elements Team:
Lesley Watt
Jenny Davies-Reazor
Phantasm Creations (you are here!)
Caroline Dewison
Linda Landig
Niky Sayers

Our Guest Bloggers:
Linda Newnham
Michelle McEnroe
Sarajo Wentling
The Paisley Lizard

Saturday, October 3, 2015

Beading Back in Time: History, the final chapter!

I can't believe it's already time for the final installment in our Beading Back in time Blog Hop Challenge.  I think it was about this time last year when the brilliant Sherri, of Knot Just Macrame, and I were brainstorming ideas.  We had both wanted to host some sort of challenge for quite some time - but each of us was a bit intimidated to bite it off by ourselves.  Having a partner to lean on when life attacks has been helpful for both of us.

So now we are into our final chapter of the Beading Back in Time challenge - History.  If you would like to play along, all you need do is choose a historical time period and create!  Should you create something using materials and techniques of the day?  Something that a person in that period would have worn?  Something made with modern methods and materials, but looks like it belongs in that period?  Or perhaps let inspiration guide you in a more abstract way, and create something that is inspired by a concept or event or accessory that is unique to that period.  Do research, have fun!  If at all possible, get out to a local museum and see the history in person!  Get to your local library and check out the fashion history and art history sections!

Soon, I will share a few of my favorite periods for adornment with you.  Until then, have fun with your research, discover lots of ideas, and create!

Tuesday, September 29, 2015

Art Jewelry Elements Component of the Month - September 2015

Well, it's the end of the month again, and you know what that means!  It's time for the great Art Jewelry Elements Blog Component of the Month challenge.
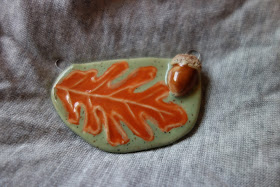
This month we all had the chance to play with one of Linda Landig's beautiful oak leaf and acorn pendants.  I chose this little guy:
I loved the pale celadon green of the background, and the orangey brown of the leaf and acorn.  For me, this type of green is very reminiscent of Home (Oregon/Washington), like trees through mist or rain.  Oak trees are also super plentiful back home, so this month I decided to make a tribute to fall in the pacific Northwest.

Then I did something I've NEVER done before.  Last week I took my component to work with me so I could sketch at lunch...and left it there over the weekend by accident!  Now when I realized that the reveal was today, I knew I needed to get to work and make the majority of the necklace without the component, in the hopes that I could stitch or tie it in the middle at the last second.  Here is what I came up with.
I had in my head a design with long green fringe, and a pile of leaves "raked" into it, but I didn't have time to do something fully stitched.  Designs like that usually require me to have the main focal on my tray for color choices and shape/size judgments anyway.  So I came up with an idea to incorporate waxed linen fringe, stitched seed bead fringe, and my favorite leather lace.  Do you see the empty set of holes above the green fringe?  Guess what goes there...
I took my linen and a couple of seed beads to work today, just so I could attach the component at lunch and finish the piece.  I simply passed the waxed linen through the holes I had made before, tied a couple of overhand knots to attach the piece, and finished off the fringe with some more seed beads. (Side note - doesn't that foil inside the large Indian lampwork bead remind you of a crunchy leaf?)
Dangling from the seed beaded fringe are laser cut wood oak leaves from an artist in Gatlinburg TN.  I drilled little holes in the top for stringing.  Alternating with the wood leaves are some vintage lucite leaves too - to give a little bit of diversity.  I love the sound the lucite and wood makes when the necklace moves - almost like leaves rustling across the ground.  I moved to 8/0 and 6/0 picasso finished seed beads for the waxed linen fringe. I love the mossy frame it creates for the dangling leaves.
And the beauty shot.  I fully admit to some trepidation when I realized I had to make this piece without having the component in hand...but I'm pretty happy with the end result.

Please hop along and see what everyone else made with Linda's gorgeous creations.  I'm off to do just that right now!


Sunday, August 30, 2015

Art Jewelry Elements Component of the Month - August 2015

This month over at the Art Jewelry Elements blog, we got to play with one of Suburban Girl Diana's rustic stoneware coin pendants.  You all know how much I love Diana's work!
As soon as I saw this picture, I thought Gee, those look familiar...don't I have one in my stash somewhere?
Sure enough, when I went digging, I was able to find this coin pendant, from a previous swap with Diana.  I had a lot of fun pulling bits and pieces out of the stash to go with it...and came up with this:
Finding that sage-y green in my stash was a little bit difficult, but I wound up with some Czech glass, some powder glass from Ghana, and a large Coke bottle green donut.  Black and white speckled powder glass and an antler bead (made by me!) helped to tie in the rustic coin.
As I was shifting things around on my tray, I stacked the two donuts on top of each other.  I purposely kept the beadwork minimal over the stoneware coin, to show it off.
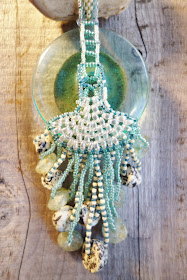
I wanted to use the black and white powder glass as a way to tie in the speckles in the stoneware, but by themselves it looked a little disjointed - more speckles were needed.  So I alternated cream and spruce colored seed beads on the fringe loops with the speckled powder glass.  I like how it ties everything together.
To keep the two donuts together, I started with a right angle weave ladder at the top, and a sling of beads around the bottom.  The fringe is attached to the lower edge of the sling.
Here you can see the back side of the donut assembly.  I used transparent gray pearl twin beads to make the back of the sling nice and sturdy.
A band of peyote around the center of the antler bead connects the donut assembly to a warped square bail.  I love using warped squares as bails!
Here you can see the full necklace  Sage Czech glass rounds in 4, 6, and 8mm frame a few more powder glass beads, pulling the fringe beads up into the necklace strap.  I finished off the rear of the strap with opaque pearl turquoise seed beads, and one of my favorite sterling J-hook clasps.
Here's your beauty shot!  I just love how everything perfectly contrasts and frames Diana's rustic stoneware coin!  Now, I'm off to see what everyone else created this month...I hope you check them all out too!

Guests

AJE Team

Saturday, August 1, 2015

Beading Back in Time - Episode 3 Reveal


Welcome once again!  Climb into our time machine as we celebrate the 3rd episode of our Beading Back in Time blog hop challenge.  A little something my buddy Sherri of Knot Just Macrame and I came up with last year, I'm so happy that we're still going strong.  I have to admit that I was looking forward to this episode's theme - Early Civilization.  Any human civilization or culture from 3500BC to 500AD was fair game for inspiration.  This meant that I could finally have a reason, motivation, muse to finish a piece that's been half done for a long time...
This was the first progress picture that I snapped, maybe 2 years ago or so?  I've always wanted to do a big Egyptian style necklace, but never really gotten around to it.  A friend and I were chatting about doing a necklace swap, and she was really interested in something Egyptian, so I figured I'd give it a go!  I didn't want to go with a super typical color palette, so I ended up using this white plaster scarab as the centerpiece.  I got this bead back in highschool on a fieldtrip to the Portland Art Museum. They were hosting a traveling Egyptian exhibit, and I had my fingers crossed for weeks in advance that they would have some sort of bead-like-object in the gift shop.  I bought a typical turquoise colored one as well, but this white one just spoke to me.
Second progress pic - filled in around the wings, and trying to figure out placement of some sodalite drops plus a big donut.  After I stitched the edging, attached the donut and drops, I was planning an intricate netted neck strap...and then the piece slithered off the table onto a concrete floor.  So much for the center drop...and my motivation.  I was still a bit sick over breaking that drop when I picked up this piece for the challenge.  But I put on my bead goggles and went to work anyway...
I ended up going for a less fiddly netted neckstrap, with lots of graphic shaped beads.  Instead of replacing the center sodalite drop with another of the same material, I went with a large blue and white striped triangle wedding bead.  The beads in the strap include vintage lucite, rough cut recycled glass, vintage and new 2 holed beads, arrowhead shaped vintage drops, and a large variety of seed beads.
I just love how the strap turned out.  The scarab was so blindingly white by itself in the embroidery section, that the addition of the arrowhead drops was really necessary.
And the beauty shot?  Here you go!
Oh, just so you know, I just got my Etsy shop reopened after moving.  I hope to list lots more (or at least get some pictures taken so I can list at my leisure) soon.  Until I do, you should check out these little baubles:
Don't you love how those first two pairs could work perfectly with this necklace?  I guess my color scheme wasn't so atypical afterall...

Please hop along and check out what everyone else made this month!  We really appreciate your views and comments!

Lindsay Starr
Sherri Stokey
Susan Kennedy
Jean Wells
Michelle McCarthy
Niky Sayers
Jenny Davies-Reazor
Stephanie Sanner Haussler

Friday, July 31, 2015

Art Jewelry Elements Component of the Month - July 2015

Yet again, where did the month go?!?  This year is just flying by.  Somehow I made a little time for beading this month and got to play along with the Art Jewelry Elements Component of the Month.  I would have been really sad to miss out, as we were all playing with either an English Farthing coin bead or clasp by our newest member, Niky Sayers.
Aren't they cute?  Wren is one of my totem animals, so I was already familiar with this coin, and have a few in my collection.  Originally I had thought to make something incorporating other coins...and then (as it usually does) something happened.  This happened!
I was having some issues originally, conceptualizing a way to not overwhelm Niky's awesome bead.  After pulling out some interesting metal pieces to play with, I ended up with this layout. 

I used purple craft wire to suspend the coin bead in the center of a textured copper hoop, and then brick stitched along the lower half of the hoop to keep the wire from sliding around on the hoop. 
Look, matching purple thread!  I love the haze it creates on the copper.  I created a bail out of a structured warped square, and attached it to the top of the copper hoop - allowing for free movement as it's being worn.  
From the lowest part of the beadwork, I suspended this awesome old key.  Maybe it's a clock key?  I don't know...and I don't know why it needed to go with this coin bead...but it did!
  I usually try to put a couple accent or contrast beads in the front of a necklace.  This time I chose some amethyst and silver foil Czech lampwork beads, and vintage glass insulators.  The exposed foil on the lampwork beads has tarnished black, but I like how it looks anyway.  These little insulators were a lucky find at one of my local bead shops.  I'm not sure what type of electrical device they would have been for originally, but I needed something to bring the steely color of the key into the upper part of the necklace.  And they're still kind of performing their original function, right?  Insulating the lampwork from the surrounding beads.
The rest of the strap alternates between some dark plummy pearls and hazy silver peanuts in 3 bead sections.  I love the texture that peanuts make when they're strung together. 
I finished it off with one of my favorite copper s-hook clasps.  I love the ease of an s-hook, but it's really important to remember to use them on heavier necklaces...this way you'll notice if they become unhooked.  I lost several lighter weight necklaces before I figured this out!

And here he is!  Little 1946 wren.  While my friend Kelly was here this weekend we had a realization that neither of us had a finished piece of beadwork from the other person...so this piece went home with her!  Though, I have to admit, I totally wore it to work all last week...I find it necessary to test drive just about everything I make.  Please tell me I'm not the only person that does?

Well, that's it folks!  Please hop around and check out what all of the other participants created with Niky's lovely beads and clasps!  I'm off to do just that!

Guest bloggers