About Me

Lindsay M Starr is a beadwork and mixed media artist currently based in Nashville, TN. She spent her early childhood in Alaska, and her school age and college years in Oregon. Lindsay has a great appreciation for history, science, and nature and is consistently inspired by insects, sea life, color, and the significance of beads and beadwork throughout human history. She spends her days beading, walking at the zoo, and practicing yoga. Lindsay loves to share her knowledge and passion for beads and beadwork to hobbyists of all skill levels.

Sunday, November 30, 2014

Sunday Funday: Week 7 - Art Jewelry Elements Component of the Month November

Week of November 24-30, End of November

Where has the week gone?!?  Oh, that's right, my last post was late...  

It's that time again everyone!  Reveal time for the Art Jewelry Elements blog Component of the Month!  This month we were all provided with gorgeous stitched twin ring components by the lovely Kristen Stevens.  Kristen is the other seed beader in the group, and we have really bonded in our shared techniques, love of art beads, and the complete difference in how we approach creating with those tiny glass beads.  You should check out more of her work here!  These are the little rings that we had to choose from, three of the gorgeous dark terra pearl colors.  
Kristen asked each of us what color we would like...well, of course I couldn't choose.  I love all of them!  So I asked her to just surprise me...and this is what I found when my package arrived in the mail!
Silly Kristen couldn't decide either and sent me a pair of each color!  Now my dilemma started.  How do you incorporate a seed beaded component into a seed beaded design and have the component remain the star?  What colors do you choose to really enhance the lovely subtle differences in the dark terra pearls?  What type of jewelry do you make to really showcase the components?  

I felt like earrings or a bracelet were the easy answers...but they wouldn't really leave me any room to do much more than attach the rings together.  So I decided to make a necklace.  Then I had to really think about color.  I needed a neutral or pseudo-neutral that wouldn't clash or compete with the components.  Here's what I ended up with as a palette.
   Transparent super light amethyst (looks much more pink/purple in the tube), was a nice mate to the plum terra pearl components, and nicely contrasted the denim and teal.  I knew that I wanted this color to be the main part of the palette, and decided on transparent and luster grays and silvers as the accent.  Do you see the little tiny 15's in the components?  They're transparent gray, the same color as the bag of seed beads on the far left.  At this point I also decided what type of necklace that I wanted to make - a netting amulet bag, incorporating the components into the fringe and the closure, with a simple strung strap.  Here's the start:
Ok, bad picture...I took this at night as a teaser for Kristen.  But I really love where the piece is going and how the components are incorporated.  So I reached the point where I needed to add the strap...and discovered that I only had one crimp left!  Doh!  I quickly ordered some more and worked on a few other projects in the interim.
Finished at last!  I really think that this design sets off the components well.  The texture of the netting doesn't detract, and the color of the beads lets the components stand out.  Lets look at all of the elements closer up.
The closure is a band of netting coming down from the back side of the bag, ending in one of the twin rings.  Then I stitched a tiny enameled butterfly button on to hold the band closed.  It fits through the hole in the center of the ring perfectly, but enough shows around the edges that you can still see that nice teal terra pearl.  I love how it looks like the butterfly has just alighted on a flower.  
The rest of the twin rings are in the fringe, dancing around like daisies in a field.  Each fringe that doesn't have a ring on it ends with 6/0 beads - clear with black stripes, matte with a rainbow finish.  I love the texture and bit of pearly color that they bring.
I thought you might like to see the back - you can really see the pattern in the stitching and the colors here.  I used a crystal sparkle silver lined seed bead for a teeny bit of twinkle in with the transparent light amethyst, and the transparent gray in the fringe and at the top of the bag as an accent.
When I strung the strap, I knew that I needed to add a bit of dark color, just so that the components looked fully incorporated.  So after a rummage through my seed bead and vintage glass boxes, I found a couple of vintage glass twisted pearl beads in a gorgeous teal, plus 6/0 seed beads in dark terra plum - an exact match to the plum twin rings!  I spaced them out with the light amethyst and sparkle silver lined 11's, plus the striped 6's from the fringe, and finished off with one of my favorite teeny sterling clasps.
I love this beauty shot!  You can really see the different colors (these dark pearls are so hard to photograph!)!  Each of them reminds me of a little daisy, just waiting for its own butterfly.  

Don't forget to check out what all the other participants made too!  The links are all listed below.  I'm going to go do that now - I just love seeing how everyone works so differently with the same components.  I will be back early this coming week with another post or two, and some sneak peaks of the holiday gifts I'm working on.  Until then, you can always keep up with me on Facebook, or check out my Etsy shop!  Thanks for looking!


Lindsay Starr (you are here!)


Tuesday, November 25, 2014

Belated Sunday Funday, Week 6

Week of November 17-23, Mid-November

It sure was nice to get back to Knoxville for a week!  I had a great time visiting friends, taking it easy, helping with birthday parties, and sneaking in some beading when I could.  I didn't get much done beyond my progress post last week and I don't want to show you the same stuff again...so today you get an eye candy post...starting off with some eye balls...
My old coworkers at the bead shop in Knoxville slipped these awesome beads into my purse when I wasn't looking.  They're by lampwork artist, Jo Marie, who is a member of the awesome Smoky Mountain Firecrackers, the Knoxville lampwork guild.  I can't wait to have the right project to work them into...so creepy cool!  


While I was at the shop, I also picked up these bright, yellow-orange, fluorescent gumdrop beads.  I don't know why I'm so entranced with this color...normally I avoid the coated fluorescent beads like the plague!  I also grabbed the dark green turquoise tiles, and was gifted the Czech pressed elephant beads.  I just love discovering a shape I haven't seen before, and it's even better when you're handed them by a friend!


These lovelies came from my friend Kelly of Beadin' Black&Blue.  We send each other beady care packages occasionally, and since we were meeting up in Knoxville she brought me a small goody bag.  The lampwork fish is from a bead shop in California where Kelly went on a recent work trip, and the yellow flowers are from yet another member of the Smoky Mountain Firecrackers.  The artist of the black/blue/purple beads is unknown to us...but apparently these beads were so weird they just screamed out my name!

I also received a package of my beadwork that had been on display at Kaleidoscope Studios, and the owner (who I've been friends with for years) tucked a bunch of beady goodness inside.  This is just a small selection...I don't want y'all to get too jealous!
Beautiful gemstone cabs!  Silver sheen obsidian, labradorite, chalcedony, and agate, in nice shapes and sizes.
Small felt ball beads (will be perfect with the sculpture I'm working on), and tiny natural pinecone beads.  I need to figure out what plant these are from...they remind me of teeny pangolins!  Apparently they originate from Africa, so hopefully that will narrow down the search.  *Edit*  After an internet search, I've discovered that these pinecones are actually the dried fruits of a type of raffia palm, grown in Camaroon!  Fascinating!
Vintage and modern Czech pressed glass beads.  That blue one is the same button I used on my Tropical Catrina necklace...it'll be good to have a few more, as I just love that bright saturated color.  And how about those peacock printed buttons?  Those will be super fun to play with!
This is just a tiny fraction of the gorgeous Czech lampwork beads that were included in the package.  I've been using quite a lot of my stash of these lately, especially in necklace straps, so I'm very pleased to have more.
If you love ethnic and trade beads, Kaleidoscope should be a mandatory stop for you if you're in Oregon.  The owner and I share a passion for old, trade, and ethnic beads, and she sent me a spectacular selection of powder glass beads, made in Ghana.  Just look at that first picture...those beads are covered in melted seed beads!  They embody what I love about powder glass - recycling garbage materials to make beads!  And the polychrome beads in the middle picture have become a recent obsession of mine.  But my favorites in the collection?  The black and white imitation stone beads in the third picture.  I don't know why!
But the best thing in the package?  More pendants to add to my Dana Swisher collection!  Do you remember her skulls that I used in this necklace?  I just love her work and always stock up when I have the opportunity.  

I hope to be adding most of the jewelry that was returned to me to the Etsy shop in the next few weeks.  Don't forget to follow along with my beady exploits on my Facebook page - watch for these beads to make a reappearance!  Sadly, now I have to clean up the bead table again for a bit to go into Christmas gift overdrive...Much sewing needs to happen!  Thanks for looking this week!

Friday, November 21, 2014

Check it out!

I have a new post up over on the Art Jewelry Elements blog this morning.  It's about a subject near and dear to my beady heart - designing jewelry for men!  If you've ever had a man ask you to make a piece for him, or just want to branch out your offerings, you should read this post.

Don't forget to follow my daily progress on my Facebook page, and do check out my Etsy shop!  As always, thanks for looking!

Thursday, November 20, 2014

November Works in Progress

I thought since I have been a bit lax in posting lately, posting a few WIP pictures might be nice. Even though I've been kidnapped by friends and whisked away to Knoxville this week, I've been beading a bit each day.  Well, except Monday...Monday I slept...a lot.

Here is the mermaid cabochon by Jenny Davies-Reazor.  I've bezeled it, embroidered a bit, then added some netting, fringe and surface embellishment.  Going to do a very simple single strung strand for the strap.
Here's a close up of the cab and surrounding beadwork.  When I showed these pictures to Jenny she said that the mermaid looks as if she's swimming through a kelp forest...which is exactly I was going for.

I've made a bit of headway on the owl piece, with this dimensional arch.  I see a little beaded triangle within the arch that the owl is suspended from, then swags of beads swooping down around the owl from the outer edges.  Still can't envision the rest of the necklace, though I am hoping to incorporate the beaded rope.

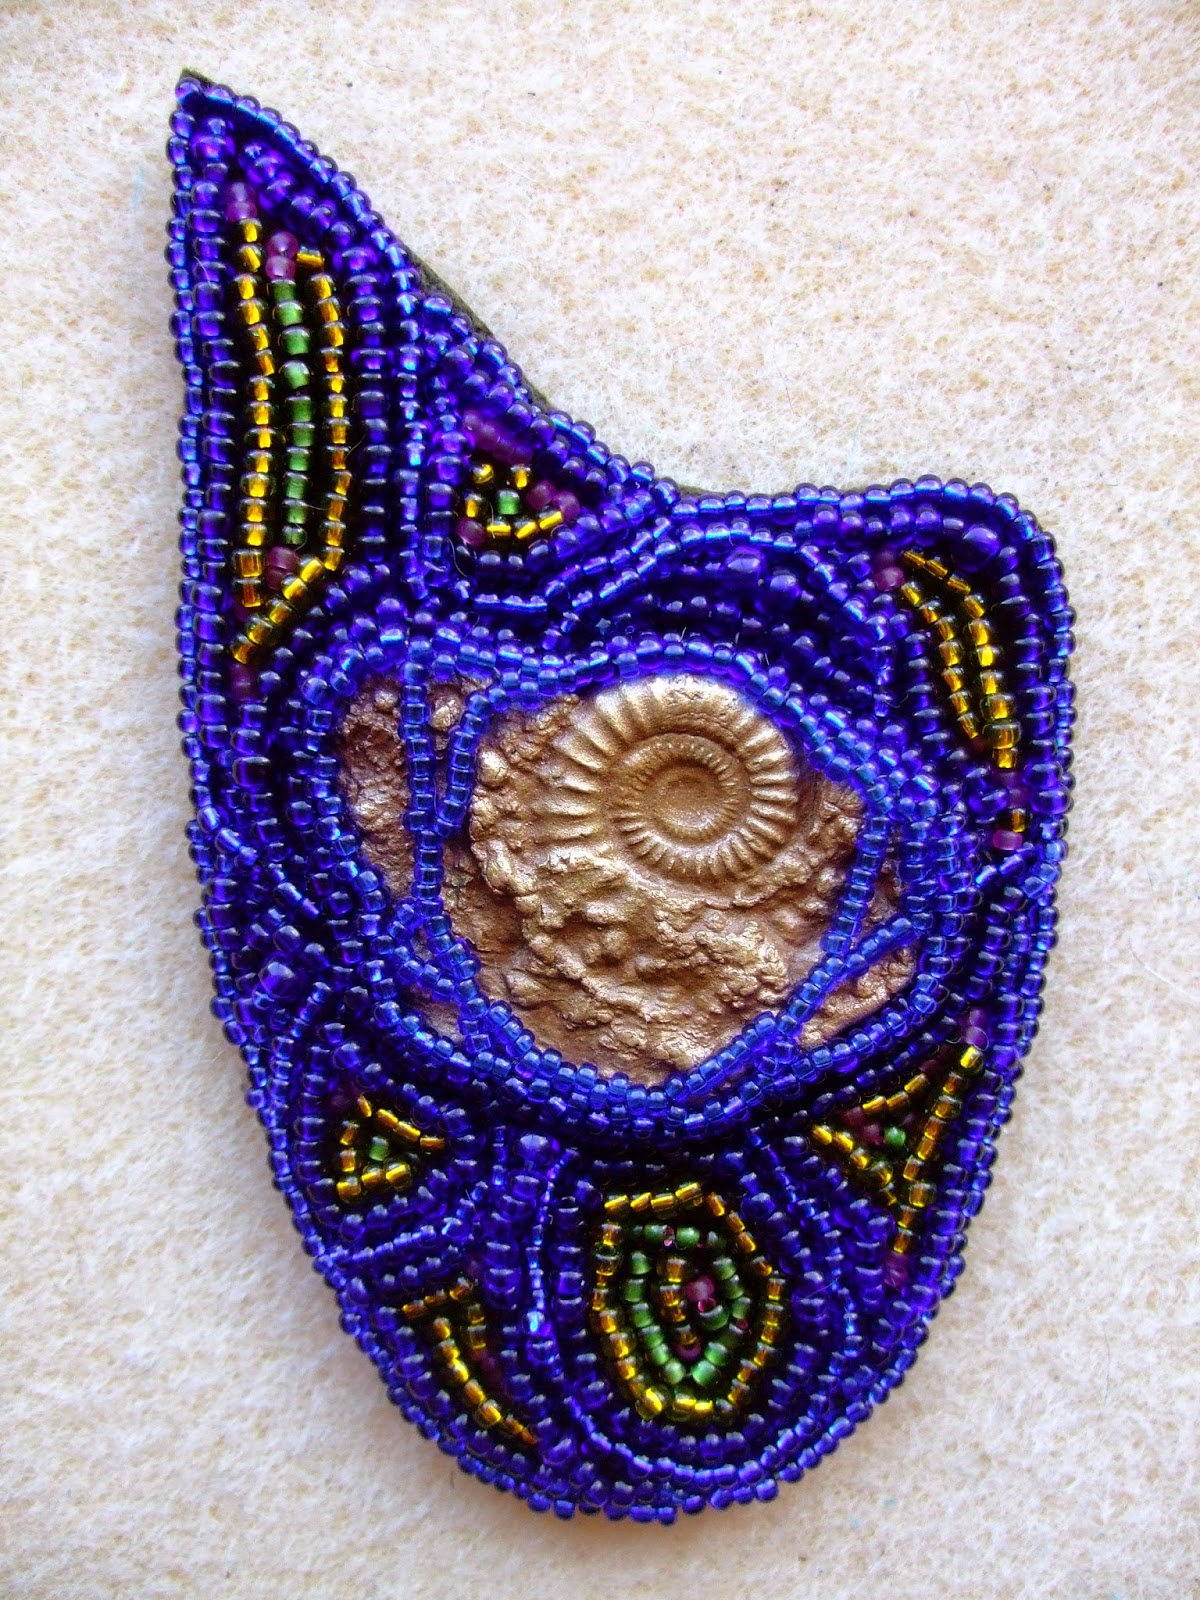
Here is what the bronze clay ammonites by Lesley Watt are shaping up into.  I've actually got more done on this since I took the picture this morning.  The little ammonite is bezeled, and edged, and I'm about halfway through the edging on the larger part.
I am going to be doing a bit of surface embellishment on this one, in copper and a muted magenta.  Hoping that it will turn out a bit like seaweed.

Remember this pendant (also by Jenny)?  I wanted to combine it with some copper chain and links...but now I'm not happy with it.
Separately the elements are fine...I love the pendant, and I love the chain and links.  But they're fighting with each other!  I need to rethink this one when I get back to Nashville later next week.

Don't forget!  You can always keep up with my daily beading exploits on my Facebook page, and shop on Etsy!  If I miss my Sunday post this week I will update on Tuesday when we get back to Nashville and our regularly scheduled life.  As always, thanks for looking!

Sunday, November 16, 2014

Sunday Funday, Week 5

Week of November 10-16, Mid-November

I was cursed by the sinus infection fairy this week!  After a trip to the doctor I am now armed with antibiotics and a fresh bottle of Flonase (seriously amazing stuff!), I am back at beading finally!  

Since I was laid low for the beginning of the week, I didn't get a whole lot of beading done.  As soon as I was feeling better, my main concern was pulling beads out of my stash for all of my projects this month.  There is quite a bit on my plate!  Take a look:
Yikes!  I've started a couple of these projects, but I thought this week I would show you what my color selection process looks like.  


First off, we have this bronze clay trio by Lesley Watt of THEA Elements and Jewellery.  I'm really excited to work on this project, but I didn't want to go with a palette that would match the bronze too closely.  I think they really deserve to be the focal of a piece, so most of my beads are in contrasting, saturated jewel tones.  When I pull beads for a project I never know which ones I will actually end up using.  Some of these will definitely end up in the finished necklace...but probably not all.  Having extra beads to look at helps me choose just the right ones for each piece.


Next we have this celtic kitty polymer clay cabochon by Jenny Davies-Reazor.  In my box of pre-beaded components I discovered this circular peyote disk that was the perfect size to cover the back of the cab.  I went with some raspberry pinks for the beads to come up and over the sides, as you can see in these pictures.
 After I had the cab captured I stitched a little bit of embellishment around the outside in the teal beads that were in the circular peyote piece.  The looping fringe also has some 1/0 super large silver lined seed beads in lime and emerald green.  
Here you can see what the back looks like!  I'm going to finish this off soon, probably with a copper chain and some textured copper links.  

While I was looking for the beaded disk, I also found this warped square of beadwork that I had made awhile back.  Apparently it was hanging around waiting for the perfect art bead to go with...and that happens to be this neat ceramic donut, also by Jenny. I only had to do a teeny bit of stitching to make this piece...just a connection from the front to the back through the hole, and a row of peyote to connect the halves of the square for more stability.  I knew it needed some fringe, so I attached some brass chain dangles, with leather, suede, and enameled charm on the ends.  The necklace is finished off with a supple leather strap.

 This whimsical green haired mermaid cab is also by Jenny.  I think this bright green palette, with a little bit of gray and ivory will set off the turquoise and blue around her nicely.  I've got the cab already glued to a piece of turquoise ultra suede, so I'm ready to go!

These little beaded rings are the Art Jewelry Elements Component of the Month for November.  When their creator, the lovely Kristen Stevens, asked which of the three colors I was interested in...I couldn't choose!  I asked her to pick for me...and the crazy gal sent me all three!  I definitely knew that I needed a palette that would set off the lovely dark pearls of these cute little rings, so I went with a soft plummy transparent amethyst, and a variety of dove grays.  You will have to wait till the end of the month to see how it all turned out...trust me, it's going to be worth the wait. 

This is the piece that I've chosen to work with for the Operation: Tackle that Bead Stash "Winter" theme challenge.  The soft aqua of the Firefly Design Studio owl lends itself to a more traditional blue and white winter palette...but I just needed a bit more excitement.  Sparkling aquas, luminous silver grays, and chartreuse are really going to set off this pendant!  


These leaves from BHClaysmith are going to be the focal point for my Art Bead Scene challenge this month.  Click the link to see the inspiration art!  I have some more colors pulled out to go with these now.  I think the finished piece is going to be a long lariat, but I also need to figure out a way to keep the leaves from clacking together.  I wouldn't want them to damage each other!  Some engineering is going to be required on this piece, and I'm not sure what that's going to entail quite yet.  

There are a couple more projects that I will save for later, mainly because they don't need to be done in November...I'm just thinking about them ahead of time!  

I shall leave you with two things.  First is the most indispensable tool in my beading arsenal - my mini shovel and thread cutter.
This little shovel has been with me over 20 years.  My mom bought it from a small bead vendor at one of her fiber arts retreats when I was 10 or 11 years old.  It is the PERFECT tool for snagging stray beads and placing them back in their containers, tubes, or baggies.  But the handle is a bit unwieldy (yes, I have slipped and dumped shovels full of beads in shag carpet before).  For a long time I had a piece of crocheted ribbon on the end that was helpful in preventing slips, but a few years ago I needed to travel on an airplane and decided to attach this travel-safe thread cutter to it.  The beaded strip that connects the two is just the perfect amount to hang on to, and I haven't dumped a shovel load of beads unintentionally since finishing it.  

And secondly... I've been kidnapped!!!  I've been whisked away to Knoxville by a couple of my friends, and will be spending the entire next week here!  Able to bead my days away, then hang out with my buddies and their 3 year old daughter in the evenings.  She has grown so much since I last saw them in September...at least 4 inches taller and much more articulate.  My, how time flies!  You can look forward to a couple of progress blog posts this week, as I will definitely have time (and be well enough) for writing. 

Thanks for catching up with me this week!  Don't forget, you can always keep up with my daily beading exploits on my Facebook page, and shop on Etsy!  As always, thanks for looking!


Sunday, November 9, 2014

Sunday Funday, Week 4

Week of November 3 - 9, Beginning of November.

I have no beadwork to show for this week.  What, you ask?  How is that possible?!?  Well remember those ornaments I showed at the end of last week's post?  I had to dismantle my beading set up so that I could have a place to use my sewing machine and dye.  I finished 39 ornaments!
Just look at them all!  I've got to get The List finalized so I know how many more to make this week before I put the machine away and get back to beading.  So even though I haven't been beading, I've been keeping very busy.

I've also had a great bead mail week, thanks to my beadfriends!
Lesley Watt of THEA Elements and THEA Jewellery is one of my fellow writers over on the Art Jewelry Elements blog.  She makes lovely ceramic and bronze clay components, and sent me a swap package of both, all the way from her home in Southern England.  Just look at all these goodies!  I'm going to make Lesley a piece of jewelry using the bronze clay ammonite cabochons (below) in return!

Remember my friend Sherri that does the awesome micromacrame?  We seem to have a quite a bit of mail going back and forth lately.  I offhandedly mentioned that I would like to try one of her kits at some day, and this little selection showed up in my mailbox a few days later!
There is black/purple, and black/white cord for making wrap bracelets with my own beads, plus a kit to make an "Owl", and Sherri's "Leaves" bracelet.  I've already watched the videos over on Sherri's blog, and I hope to start experimenting sometime before Thanksgiving.

I also received a nice little surprise from Jenny Davies-Reazor, another AJE member, and someone who's work I've ogled for years.
I love all of the symbolism and history that Jenny puts into her pieces - you can tell that she is passionate about putting meaning into her components.  She also makes full-size ceramic art tiles that are spectacular!  You should check out her work!

I finally got some new pieces listed on Etsy, like I've been promising.  I had good luck with writing, so there are a few more that will go up this week.  Keep an eye out on my Facebook page - I will post updates when they go live.

Along with all the ornaments and typing that I've done this week, I'm in the middle of holiday gift making.  I was in the need of some inspiration (and needed to get out of the apartment) earlier in the week, so I went over to the yarn store across town.  I had been there years ago when we lived in Nashville before, but since that time the shop has moved and expanded, and is one of the BEST yarn and fiber shops I've ever been in.  The riot of color and texture was just what I needed, and I couldn't resist buying this awesome Japanese thread-like yarn - silk, twisted with stainless steel wire (as thin as spider-silk).  I knew exactly what I wanted to do with it!
Ok, so no surprise that I got the purple yarn, right?  The stainless steel wire is so fine that it only shows up when the light hits it just right.  But it still adds body to the silk, so rather than being limp, this tassel is almost fluffy!  Those little white "hairs" you see in the picture are actually the steel wire, reflecting the light.  I'm going to have to try some teeny tassels next, something earring sized.

Thanks again, for catching up with me this week!  Don't forget to check out my first post over at the AJE blog!  As always, you can keep up with my daily beading exploits on my Facebook page, and shop on Etsy!  As always, thanks for looking!

Tuesday, November 4, 2014

Exciting Announcement

Do you remember this post from a few weeks ago?  Well, I now have an exciting announcement to make - I've been officially invited to become one of the regular writers for the Art Jewelry Elements blog!

The blog is spearheaded by the marvelous Jen Cameron of Glass Addictions (remember the key necklace from my Sunday post?), and consists of 13 (including me) other bead, component and jewelry artists.  Everyone takes turns posting about a variety of topics, including their studio's, bead photography, process and design, and interesting tips and tutorials.  I am super excited to be a part of this marvelous group!

Look for my first post this coming Sunday!  I will post a link here, as well as on my Facebook page.  Ok, now I'm off to work on Etsy listings!  Thanks for looking!

Sunday, November 2, 2014

Sunday Funday: Week 3

Week of October 26 - November 2, Happy Halloween and Dia de los Muertos!

I did strangely little beading this week...but still have a lot to share!  How does that happen?  Well the digital bead world is very busy at the beginning and end of each month.  I've got 3 blog challenges to catch you up on, but first I wanna reveal my 500 likes Giveaway winner!

Huge congratulations to Lisa Walton, of England, for being the random winner of the giveaway!  Lisa chose Flower, and I'll be headed to the post office with her in the morning to fill out that pesky customs form!  I am pretty sure this is my first piece that will have a home in the UK, and only my second piece to live outside the States.  How cool is that!  I hope you love her as much as I do, Lisa!

Bop on over to the Art Bead Scene blog and Pinterest board to see all the lovely entries for the month!  You can see more of my entry in this post!  I can't wait until Tuesday when they announce the new piece of inspiration art for November - I'm really looking forward to playing again this month.

And then there's the Art Jewelry elements Component of the Month challenge!  Check out my post from yesterday to read about mine, and don't forget to click on the links for everyone else's blogs too!  They all made fantastic pieces, and the best thing is being able to see what a bunch of different artists do with the same (well, similar) focal component.

Remember this post?  Well, the reveal for the Operation: Tackle That Bead Stash blog October Jet Black challenge was yesterday too.  I was super impressed with the amount of entries that they received!  And so many of them are seed beaders too!  The theme for November was just announced, and it's Winter.  I've already got the perfect pendant pulled out, so stay tuned!

This week I only made a couple of things.  I think household chores, and thinking about all the Christmas ornaments and gifts I need to start was stressing me out...along with an EPIC beadsplosion on my work table.

One of the things I did complete was this little pendant, as a surprise gift for Sue Kennedy of SueBeads.  We recently did a swap, and while I was working on my half of it (it's a gift for someone so you'll just have to guess what it was), beads arrived from her in the mail!  I was so inspired by them that I immediately took this tiny disk bead and added it to one of my encrusted polymer clay faces.  I embellished her, and strung her on a sari silk ribbon, so she was ready for Sue to wear.  I love that she looks like she's wearing a little fascinator head-thingie!

I also received a swap package from Jen Cameron of Glass Addictions!  She asked that I make her a necklace using this key that she's made a lampwork bead on, and this is what I came up with.  The necklace is 30" long, so I was able to use leather in the back, and beadwork on the sides...I'm hoping that this will make it a bit more wearable for Jen (who doesn't wear much jewelry in her everyday life).

Here you can see the beadwork around the key up close.  Each of the little charms is different, and they add a lot of movement to what would otherwise be a very static piece.

Here's Jen's work up close!  I purposely chose a palette closer to the key so that the bead would really stand out, and went with dark purple accents to bring out the purpley-blue colors in the bead bumps.

You thought I wasn't going to give you a beauty shot, right?  I didn't forget!

The rest of my creativity was used up this week on the great Christmas ornament fiasco.  When I was packing to move I discovered a bag of halfway made ornaments from 4 years ago.  I have a tendency to make things like this in an assembly line fashion, so when I was making these back then I only finished as many as I needed.

I think you can see the direction I was headed.  They're little flat stuffed animals, with felt fronts and leather backed.  Then I do some accent bead embroidery to define eyes, noses, mouths, and other fun things.  I had 3 that were already beaded, and drug out all the beads to finish these...I was fully intending on spending the next week or two working on these non-stop!  But I was just hating every second of it...

So I came up with a new idea, bagged all these back up and put all the beads away!  I feel so much better now, and worked some yesterday on my new ornaments...I think they're going to be super cool!

Here's a sneak peek of the direction they're going - these are the paper pattens!  I've gotta run out to the storage unit later to get some more supplies for them, but I should be able to continue working on them tomorrow.  All the fun parts are left!  As long as everything works like it does in my head...

I wanted to share one more thing this week, completely un-bead related.  I made oatmeal for lunch yesterday.  So what, you say?  Well, I made it in my rice cooker, and it was the most AMAZING oatmeal ever!

If you have any type of rice cooker, and all you cook in it is rice, I HIGHLY recommend this book - trust me, no one is paying me to say that.  Our rice cooker gets more use than our microwave - there is really no end to the delicious sides and meals you can cook besides plain rice.  That includes grains like oats - old-fashioned rolled, and even steel-cut!  Yesterday I used their basic ratios for a large batch of oatmeal, and added a couple cinnamon sticks and a handful of raisins.  When the cooker finished (mine plays music when it's done...bonus), I got a bowl full, added a bit more almond milk, and drizzled maple syrup on top.  Seriously, rice cooker oatmeal is unbeatable!  It gets so much softer and creamier, the raisins are delectably plump.  It's almost like a pudding, and it's so good!  If you like steel-cut oats, this the ONLY way you should cook them.  And in case you're wondering now that I've mentioned pudding...yes you can make rice pudding and other types in the rice cooker.

Thanks for catching up with me this week!  I know I promised Etsy listings...well, they didn't happen, oh well!  I'll aim for this week with those!  Don't forget, you can always keep up with my daily beading exploits on my Facebook page, and shop on Etsy!  As always, thanks for looking!