Friday, December 22, 2017

Art Elements December 2017 Ornament Challenge

I was really excited when an ornament challenge was chosen for the Art Elements blog challenge this month.  I have loved making Christmas ornaments since I was a child, for even longer than I have been beading!  Every few years I still make an effort to make a large batch of ornaments for the whole family, and lots of friends.  This is more difficult to do with a full time day job now, but that is the main reason I am glad for the challenge theme this month.
I procrastinated quite severely though, due to both a lack of ideas and too many ideas.  The problem was that I have made lots of different types of ornaments before, but didn't want to repeat something I've already done and couldn't make up my mind on something new to try either.  Then a package arrived from back home, and my mom included two little gnome hats she had made.  This hat is cut from a worn out wool sock.  Apparently her original idea was to make little gnome ornaments with them, but this is as far as she got.  So she threw them in the Christmas package and sent them to Tennessee for my dolls!  There are two hats, but one got used up in this challenge...
Because now I have a Christmas Gnome!
I used a circle of felt for the head, and a circle of boiled wool fabric for the body.  Ran a gathering stitch around the outside of each, stuffed, and sewed the two balls together.  Then I sewed on the hat, and glued the beard to the face.
The scarf is also glued on, and positioned to separate the beard and mustache.
I used a piece of wire pierced through the hat to make a tree hook.
And glued on a couple of buttons for eyes.
Christmas Gnome wishes you and your family the very best holiday!  Stay warm and cozy with some beads and maybe some kitty snuggles!  He hopes you will hop along and see what everyone else has made too!

Guest Designers
Art Elements Team

Thursday, December 21, 2017

Tacky Holiday Earring Blog Hop

I had to join my friend Diana's Tacky Holiday Earring blog hop when she announced it on Facebook recently.  I don't wear earrings regularly any more because my dayjob involves being on the phone wearing a headset for most of the day.  BUT I LOVE MAKING EARRINGS.  They are true instant gratification projects.  To fulfill the tacky part of the challenge, I dug into my bin of plastic beads and things, on the hunt for some little things I knew I had squirreled away...and the adventure began...
I have had these little Domo-kun charms for years.  They are from a movie theater vending machine.

Devil Domo's are selected...perhaps you sense what is coming next...
SNIP SNIP.  Are you laughing yet?  They are so distressed!
It all starts with some red felt, white mohair, and a hot glue gun...
Hair styling...
Beard and jacket happen at the same time, because the edge of the collar will hold the beard in place...
A corner of the fabric is snipped to make the shawl collar.
Snip off the other corner and the jacket is done...but some accessories may be needed...
Oh, that's right, a belt with a gold buckle...
And the hat!
I attached a wire to the charm's loop before attaching the hat, then slid the hat right on the wire!  A slight trim to get the hair out of his eyes, and a teeny pom pom finish it off.  But don't you need another for a pair of earrings?
Yes, you do!  Everything starts the same...
But, this one needed an extra tuft of hair...
Because the finished hairstyle is a granny bun...you can tell where this is going next, right?
A simple a-line dress needs lots of accessories, right?
Like a pearl necklace, and poinsettia in her ?
Plus a hair ribbon and fancy gold "brooch"!
Introducing Domo Claus and the missus.  I hope you all had as much fun following along as I did making this pair!
Please hop along and see what other tacky holiday delights everyone has come up with! 


Laney Mead

Heather Boardman

Tuesday, October 31, 2017

Art Elements Component of the Month October 2017

I always feel like I start these posts with the same statement...How on earth is it October already?!  Wasn't it just February?  It's time again for the Art Elements component of the month reveal!

This time we got to play with one of Niky's hare coin clasps.  As always when I use delicate components, I know my struggle is going to be how to make the component really stand out!  Add in the fact that I don't typically work with much metal, and this month was a particular challenge for me.

Luckily, the deadline for this month managed to sync up with my trip to visit my PiB Kelly for a long weekend.  If you're not sure what I mean by PiB, check out my last two posts about Kelly (Here and Here) and our relationship with each other and beads.  Kelly became a first time home owner earlier this year, and I hadn't been up to see her new digs yet!  We spent the weekend cooking, brewing batch after batch of tea, binge watching shows and videos, and BEADING.  I had brought the majority of my art bead collection, since we intended to do an art bead trade, so when I started playing around quite a few art beads made it into the initial design.  Fortunately, this is as far as I got before I realized it was just TOO MUCH for the clasp.  I cut everything apart to scale back a ton, or I knew I wouldn't be happy with the finished piece.  *cringe* Yes, that is sterling wire....
Here is where I ended up!  This is my take on Aesop's The Tortoise and the Hare.  Much more delicate and in scale with the coin clasp.
I used the dangle on the bottom of the copper component to pull in bright shiny silver to complement the clasp.  Clustering above the sodalite drop are some special beads.  I made tiny dangles with star head pins, teeny labradorite and iolite rounds, and vintage Mercury glass beads.  There is a round one in the center, surrounded by textured flat teardrops.  I have never bought Mercury glass intentionally, but it keeps showing up in random lots of vintage jewelry and beads that I encounter.  It just seemed like the right thing to use to add some more shine.
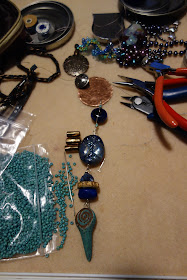
Kelly works with metal, so she made me this awesome copper disk to use as a center piece.  We punched a big hole on one side to use as the ring side of the coin clasp.  It functions not only as half of the clasp, but the fact that it is large and flat means that the clasp does not have the option to flip or twist to the back of the necklace.  To attach the dangle, and half of the necklace strap, I made two links coming off of my carved sodalite tortoise and passed them through the other holes in the copper disk.  To make for a bit more security, I attached the other side of the necklace strap to another wire link with a flower bead - this meant I didn't need to worry about the beading cable potentially slipping through the link on the clasp.
To add in a third point of silver, on the other side of the strap I went a bit more subtle and used a few wire links with really light labradorite beads, and my favorite iolite beads.  I'm going to be so sad when I use up the last few beads from this strand!  Since the beads are not bright silver like the clasp and mercury glass, I used three in a row to add a bit more impact.  I like how this collection of 3 silver elements keeps your eye traveling from place to place when you're looking at the necklace as a whole.
The bulk of the necklace strap is tubular herringbone with matte metallic antique brass finished bugles and 11/0 semi-matte teal lined seed beads.  The teal seed beads perfectly match the fleeting flashes in the labradorite beads.  Because there are so many precious and sharp elements in this necklace, I decided to string the entire herringbone tube on beading cable for added durability.  This means the beadwork is not taking the brunt of the wear!
By the time I had a chance to photograph this piece I had lost most of the light for the day, but I did manage to snap this picture so you can see the detail in the coin and mercury glass at the same time.  There are so many disparate elements going on in this necklace, but I am really pleased with the results! 

Please do hop on over to everyone else's blog and see what they created with Niky's delightful hare clasps this month!  I'm off to do just that now!  Thanks for looking!

Guest Designers
Linda Landig
Kathy Lindemer
Divya N
Art Element Team
Claire Fabian
Jenny Davies-Reazor
Cathy Spivey Mendola
Susan Kennedy
Caroline Dewison
Lesley Watt
Diana Ptaszynski
Lindsay Starr
Laney Mead
Niky Sayers


Saturday, September 30, 2017

Art Elements Component of the Month October 2017

I was super excited to see that Laney decided to send off a flock of her zombees for us to play with this month...  If you are not familiar with Laney's whimsical (and sometimes beautifully realistic!) lampwork creations - you should be!  I had bought half a dozen zombees last fall because they made me laugh out loud when I saw them in my facebook feed.  I love seafoam green, and opal type glass, bugs and funny beads so they just ticked every box for me.  Laney sent me one more little critter this month for participating, which expanded my stash into a hoard...oh what to do!?!
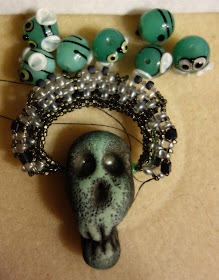
My friend Kelly had given me this gorgeous lampwork skull by Nikki Thornburg-Lanigan awhile ago, and I knew he would look great with the zombees.  I had a fun idea, but then decided I didn't have enough time to do it and started beading this halo-esque support for the skull.
My thought was for the beadwork to be the under-structure for a zombee laden flower crown...but I knew I couldn't get it done in time and cramming all the zombees into such a tight space seemed...wrong?  Like they need more space to bumble (because that's totally what zombees do instead of shamble...) around.  Back to the bead board.
So I strewed things around and pulled out a bunch of beaded components and Czech glass, just to make sure I was ok with cutting off the beading I had done.  I hate "wasting" beadwork, but sometimes it's best to stop right when you realize you're going the wrong way.  I ended up re-imagining my original idea of long scarflike netting with bees sprinkled on the ends around the central skull, into something simpler.
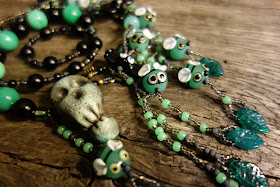
I made a zombee hoard, guided by a necromancer with a few bats (also by Laney!) thrown in for good measure!  And a zombee hoard (hive?swarm?) has been on my mind since the first ones came home last fall.

My favorite little zombee is this guy - I'm calling him Beenjamin.  I wanted to set him apart from the others, so he is suspended on a single strand of fringe, opposite the rest of the swarm.
 Beenjamin is really special - I love his smaller, wide set eyes because he always looks beefuddled!
While I love a clasp that blends in, there is so much going on in this necklace that I don't mind having the simple brass toggle right in the front of the piece.
Opposite the swarm, I strung the strap with large opal green and black Czech glass beads, as I needed some substantial weight to balance the zombees.
The ladies of the swarm - Beeulah, Beetrice, and BeeBee...
In the middle you can see Barbee and Beena, along with bats Thomas and Tyrone...
And last but not least, Bambee with Tyrone below and Theo above.
I love these emerald opal vintage glass beads for the texture, and variation in color they add to the whole piece.
I'm just so pleased with how everything turned out!  The swarm seems happy in their new home, and the balance of the whole piece means that I don't fidget with it all day long. 
I do hope you will buzz along and check out what everyone else has done with their zombees!  I am off to do just that!

Guests
Linda

Team

Laney Mead

Thursday, August 31, 2017

Art Elements Component of the Month August 2017

This month over at the Art Elements blog, we were fortunate enough to be able to play with some of Caroline's new starry galaxy-esque beads.  I LOVE Caroline's work.  Every new things she comes up with is my favorite new thing.  I feel so lucky to be able to work with her components and beads, much less be challenged to use them!

Even with my epic love of Caroline's work, I struggled with inspiration...until...TOTALITY!
Photos of the 8/21/17 solar eclipse, by my friend Katherine.

This year on August 21st, I was able to see a full solar eclipse for the first time in 27 years.  My job organized a mandatory viewing party, so we all got to leave our desks for a few minutes to watch the progression of the eclipse and full totality.  It was beautiful and eerie and curious.  So neat to see the birds all fly home, the cicadas ramp up the evening song, a few bright stars peep out, and all of it reverse in just a few minutes.  But during totality, I just couldn't take my eyes off the hole in the sky!  I know that in reality a black hole would not be visible, but totality looked just like I imagine a black hole would.

And so I created my own version of totality.  Carolines beads so perfectly captured the first stars peeping out so I created an environment for them to twinkle in.

I started my sun corona with a copper hoop, and worked off of it in a combination of brick stitch, herringbone, and square stitch.  This combination of stitches allowed me to make the asymmetrical halo effect that was in my head.  To add a bit more star-like twinkle, one of the rounds of herringbone has a 2mm crystal vitrail fire polished bead in between each stitch.  I love incorporating these beads because you can't tell them apart from seed beads at a glance...but the sparkle they add is eye catching.

Along with Caroline's fantastic beads, the fringe also contains lampwork headpins and a bead from Sue, along with a couple of other lampwork beads from local artists.  I wore the necklace to work today and was reminded why my favorite necklaces all have fringe with large beads in them...I love the sound of beads clacking together.
Both sides of the strap are herringbone.  One side is tubular herringbone with seed beads and bugles, and the other is a modified flat herringbone using 2 sizes of seed beads and 2 holed dome beads.
I also love doing this type of front closure lariat-style necklace.  I think of them as "gravity" clasps - where the weight of each half, and looping part of one side through the other is the only thing that keeps the necklace closed.  This also gives you a lot of variations to play with - maybe not as big of a variety as a traditional lariat, but more than if the two sides were stitched in place and a traditional clasp were used.  Plus...if you get bored you can change it up all day long
Thank you Caroline for sharing your beautiful twinkly beads with us!  Thank you all for taking the time to see what I've been up to.  I hope you will all hop along and see what everyone else has created with Caroline's lovely beads this month too...I'm off to do just that now!
Guests


Art Elements Team